How to Clean Your Instrument: Tips for a Healthy and Long-Lasting Musical Experience
As musicians, we understand the importance of maintaining our instruments to ensure a healthy and long-lasting musical experience. However, many of us neglect the significance of cleaning our instruments, leading to premature wear and tear, reduced sound quality, and even damage to the instrument. In this article, we will explore the reasons why cleaning your instrument is crucial and provide you with tips on how to do it properly. From the benefits of regular maintenance to the risks of neglect, this article will give you the knowledge you need to keep your instrument in top condition and enhance your musical experience.
The Importance of Cleaning Your Instrument
The Effects of Dirt and Grime on Your Instrument
- How dirt and grime can damage your instrument
Dirt and grime are inevitable byproducts of playing any musical instrument. Over time, they can accumulate on the surface of the instrument, in the crevices, and around the keys or strings. These particles can consist of sweat, skin cells, dust, and other debris that can penetrate the porous material of the instrument and cause damage.
The accumulation of dirt and grime can lead to a buildup of moisture, which can promote the growth of bacteria and fungi. This can cause odors, discoloration, and corrosion of the instrument, which can affect its overall sound quality and durability. In extreme cases, the buildup can clog the mechanisms of the instrument, causing malfunctions or even permanent damage.
- The importance of regular cleaning to maintain your instrument’s condition
Regular cleaning is essential to maintain the condition of your instrument and ensure a healthy and long-lasting musical experience. Cleaning removes the dirt and grime that can damage the instrument and restores its natural finish. It also helps to prevent the buildup of moisture and bacteria, which can lead to odors and corrosion.
Regular cleaning can also help to maintain the value of your instrument. By keeping it in good condition, you can extend its lifespan and ensure that it remains playable and enjoyable for years to come. In addition, regular cleaning can help to prevent costly repairs or replacements, which can be necessary if the instrument is not properly maintained.
Overall, regular cleaning is an important part of being a responsible instrument owner. It is a simple and effective way to maintain the condition of your instrument and ensure a healthy and long-lasting musical experience.
The Benefits of Cleaning Your Instrument
- Improved Sound Quality: Cleaning your instrument can help to remove dirt, dust, and debris that can accumulate on the surface and inside the instrument. This can improve the overall sound quality by ensuring that the instrument is producing a clear and consistent tone.
- Hygiene: In addition to improving the sound quality, cleaning your instrument is also important for hygiene purposes. Instruments can harbor bacteria and other microorganisms, which can cause skin irritation, allergies, and other health problems. By regularly cleaning your instrument, you can help to prevent the growth of these harmful microorganisms and keep your instrument and yourself healthy.
- Extending the Lifespan of Your Instrument: Regular cleaning can also help to extend the lifespan of your instrument. Dirt and debris can cause damage to the instrument over time, including scratches, dents, and corrosion. By keeping your instrument clean, you can help to prevent these types of damage and ensure that your instrument remains in good condition for years to come.
Cleaning Your Instrument: Step-by-Step Guide
Preparing Your Instrument for Cleaning
Understanding the Importance of Proper Preparation
Before embarking on the cleaning process, it is crucial to understand the importance of proper preparation. A well-prepared instrument is more receptive to cleaning and is less likely to suffer damage during the process. To achieve optimal results, consider the following points:
- Inspect your instrument for any visible signs of dirt, dust, or debris.
- Loosen any tight screws or bolts that may impede the cleaning process.
- Check for any sensitive areas, such as delicate electronics or mechanical parts, that may require special attention.
Assessing Your Cleaning Materials
Choosing the right cleaning materials is critical to the success of your cleaning process. Depending on the type of instrument you have, different materials may be required. It is essential to research the specific needs of your instrument and choose cleaning materials that are compatible with its materials and construction. Some common cleaning materials include:
- Microfiber cloths
- Soft brushes
- Dusters
- Cleaning solutions (e.g., alcohol-based or silicone-based)
Make sure to read the manufacturer’s instructions for any cleaning materials you use to ensure they are safe and effective for your instrument.
Familiarizing Yourself with the Instrument’s Design
Before cleaning your instrument, it is essential to have a good understanding of its design and components. Familiarize yourself with the layout of the instrument, including its keys, buttons, and controls. This knowledge will help you navigate the cleaning process more effectively and avoid any potential damage.
By taking the time to properly prepare your instrument for cleaning, you will set the stage for a successful and safe cleaning process. In the next section, we will delve into the step-by-step guide for cleaning your instrument.
Cleaning the Outer Surfaces of Your Instrument
When it comes to cleaning your instrument, the outer surfaces are just as important as the inner ones. Dirt, dust, and grime can accumulate on the exterior of your instrument, which can affect its overall appearance and potentially its function. Here are some tips on how to clean the outer surfaces of your instrument:
- Use a soft, dry cloth to wipe down the exterior of your instrument. This will remove any loose dirt or dust that may be present.
- Use a soft-bristled brush to gently remove any debris that may be stuck in the crevices of your instrument. Be careful not to apply too much pressure, as this could damage the surface.
- Use a mild soap and water solution to clean the exterior of your instrument if it is particularly dirty. Make sure to rinse the soap off thoroughly with a soft cloth.
- Dry the exterior of your instrument with a soft cloth or towel. Avoid using paper towels or other abrasive materials, as these can scratch the surface of your instrument.
- Inspect the exterior of your instrument for any damage or signs of wear and tear. If you notice any issues, it may be necessary to consult with a professional repairman.
By following these steps, you can ensure that the outer surfaces of your instrument are clean and well-maintained. This will not only improve its appearance, but it will also help to prevent any damage from occurring due to dirt or grime buildup. Remember to clean the exterior of your instrument regularly to keep it in top condition.
Cleaning the Keys and Mechanisms of Your Instrument
Maintaining the keys and mechanisms of your instrument is crucial to ensure smooth and efficient playing. Dirt, dust, and debris can accumulate in the nooks and crannies of the keys and mechanisms, causing stickiness and malfunctions. Regular cleaning can prevent these issues and prolong the lifespan of your instrument.
Here are the steps to clean the keys and mechanisms of your instrument:
- Disassemble the instrument: Before cleaning the keys and mechanisms, it is essential to disassemble the instrument. This allows you to access all the nooks and crannies where dirt and debris can accumulate. Follow the manufacturer’s instructions for disassembly.
- Use a soft brush: Use a soft brush to gently remove any visible dirt and debris from the keys and mechanisms. Avoid using brushes with stiff bristles, as they can damage the delicate components of your instrument.
- Clean with a solution of mild soap and water: Mix a solution of mild soap and water in a bowl. Dip a soft cloth into the solution, wring it out thoroughly, and wipe down the keys and mechanisms. Avoid submerging the components in the solution, as this can cause damage.
- Rinse with clean water: After cleaning with the soap solution, rinse the keys and mechanisms with clean water to remove any remaining soap residue.
- Dry the components: Use a soft cloth to dry the keys and mechanisms thoroughly. Avoid using heat or harsh chemicals, as they can damage the instrument.
- Reassemble the instrument: Once the keys and mechanisms are clean and dry, reassemble the instrument following the manufacturer’s instructions.
It is essential to clean the keys and mechanisms of your instrument regularly to prevent damage and ensure smooth and efficient playing. Remember to be gentle when cleaning and avoid using harsh chemicals or abrasive materials, as they can cause damage to the delicate components of your instrument.
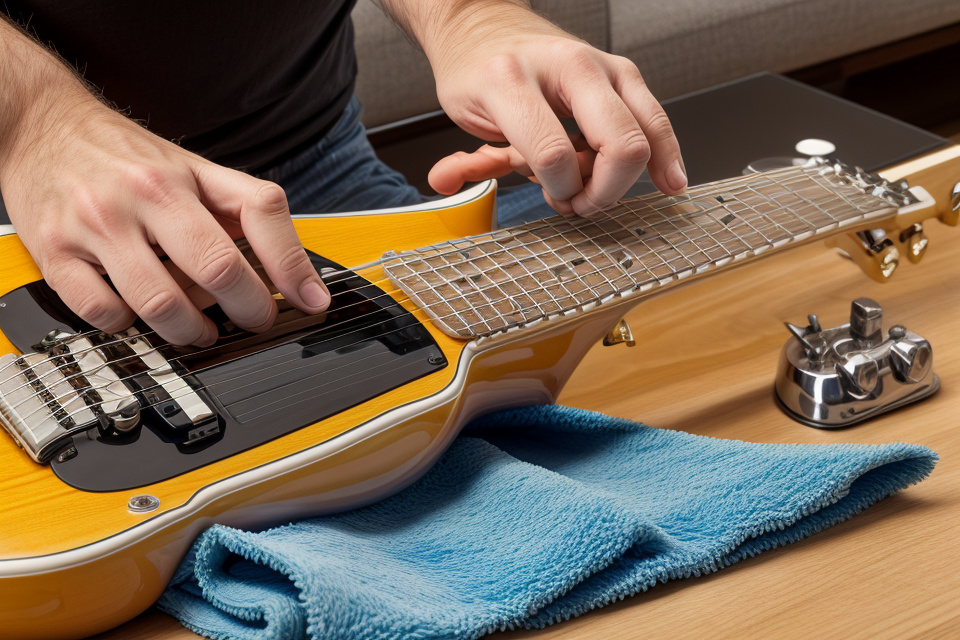
Cleaning the Strings of Your Instrument
How to clean the strings of your instrument
Cleaning the strings of your instrument is an essential part of maintaining its overall health and longevity. Over time, strings can become dirty and dull, which can affect the sound quality of your instrument. To clean the strings of your instrument, follow these steps:
- Loosen the strings: Before cleaning the strings, loosen them slightly to make it easier to remove dirt and debris.
- Remove dirt and debris: Use a soft, dry cloth to gently wipe down the strings to remove any dirt or debris that has accumulated on them.
- Use a string cleaner: If there is stubborn dirt or debris on the strings, use a string cleaner to help remove it.
- Clean the fretboard: While you’re cleaning the strings, take the opportunity to clean the fretboard as well. Use a soft, dry cloth to wipe away any dirt or debris that has accumulated on the fretboard.
The importance of cleaning the strings regularly
Cleaning the strings of your instrument regularly is crucial to maintaining its overall health and longevity. When strings become dirty and dull, they can affect the sound quality of your instrument and can also contribute to the buildup of dirt and debris on other parts of the instrument. By cleaning the strings regularly, you can help to prevent these issues and ensure that your instrument continues to provide you with a high-quality musical experience.
Cleaning the Case and Accessories of Your Instrument
When it comes to maintaining your instrument, cleaning the case and accessories is just as important as cleaning the instrument itself. A dirty or neglected case can attract dust, dirt, and even pests, which can damage your instrument and its accessories. Here are some tips on how to clean the case and accessories of your instrument:
- Remove all the items from the case, including the instrument, shoulder rest, music stand, and any other accessories.
- Use a soft, dry cloth to wipe down the inside and outside of the case. If there are any stains or dirt buildup, use a mild soap or cleaner specifically designed for instrument cases. Be sure to follow the instructions on the label and test it on a small, inconspicuous area first.
- Use a soft-bristled brush to clean the lining of the case, paying particular attention to any areas where the instrument rests, such as the neck rest or the shoulder rest.
- Clean the accessories separately, using a soft cloth or sponge to wipe away any dirt or dust. If there are any stubborn stains or dirt buildup, use a mild soap or cleaner and let it sit for a few minutes before rinsing it off with water.
- Allow the case and accessories to air dry completely before putting them back in the case. If you’re in a hurry, you can use a clean, dry towel to pat them dry.
By following these simple steps, you can keep your instrument case and accessories clean and free of damage. Not only will this help to extend the life of your instrument, but it will also help to keep it in good condition and ready to play at all times.
Tips for Maintaining a Clean Instrument
Creating a Regular Cleaning Schedule
Creating a regular cleaning schedule for your instrument is crucial to ensure its longevity and maintain its optimal performance. The frequency of cleaning may vary depending on the type of instrument and the conditions in which it is used.
To create a regular cleaning schedule, follow these steps:
- Assess the Condition of Your Instrument
Before you begin cleaning your instrument, it is important to assess its condition. Check for any visible dirt, dust, or debris that may have accumulated on the surface. If there are any visible signs of damage, such as cracks or scratches, you should consult with a professional repair technician before proceeding with any cleaning procedures. - Determine the Type of Cleaning Solution Needed
Depending on the type of instrument, you may need different cleaning solutions. For example, wooden instruments may require special cleaning solutions to prevent damage to the wood. It is important to choose a cleaning solution that is safe for your instrument and does not contain any harmful chemicals. - Establish a Cleaning Schedule
Once you have determined the type of cleaning solution needed, you can establish a cleaning schedule. This should include regular cleaning sessions, as well as periodic deep cleaning sessions, which may require more time and effort. - Set Reminders
To ensure that you stick to your cleaning schedule, set reminders for yourself. This can be done through a calendar, alarm, or any other reminder tool that works for you. Consistency is key when it comes to maintaining a clean instrument.
In conclusion, creating a regular cleaning schedule is an essential part of maintaining a healthy and long-lasting musical experience. By following these steps, you can ensure that your instrument remains in good condition and continues to perform at its best.
Storing Your Instrument Properly
When it comes to maintaining a clean instrument, proper storage is key. Here are some tips for storing your instrument correctly to prevent damage and dirt buildup:
Keep Your Instrument in Its Case
One of the most important things you can do to keep your instrument clean is to keep it in its case when it’s not being used. This will help protect it from dust, dirt, and other particles that can accumulate on the instrument and cause damage over time.
Choose the Right Case
Not all cases are created equal. When choosing a case for your instrument, make sure it’s made of a material that will protect your instrument from the elements. Hardshell cases are usually the best choice, as they provide the most protection against impacts and other types of damage.
Clean the Case Before Using It
Before putting your instrument in its case, make sure to clean the case itself. Dust and dirt can accumulate in the case over time, and this can cause damage to your instrument. Use a soft cloth to wipe down the inside of the case and remove any debris or dirt.
Store Your Instrument in a Dry Place
Moisture can be a major enemy of musical instruments. If your instrument is exposed to moisture, it can cause damage to the wood, electronics, or other components of the instrument. Make sure to store your instrument in a dry place, away from any sources of moisture, such as windows, sinks, or bathtubs.
Check for Any Loose Parts
Before storing your instrument, make sure to check for any loose parts. Loose parts can become dislodged during transport or while the instrument is in storage, and this can cause damage to the instrument. Make sure to tighten any screws or bolts that may be loose, and double-check to make sure that all parts are secure before storing your instrument.
By following these tips for storing your instrument properly, you can help ensure that your instrument stays clean and in good condition for years to come.
Caring for Your Instrument When Traveling
Traveling with your instrument can be a hassle, but it’s important to take proper care of it to ensure it stays clean and in good condition. Here are some tips for caring for your instrument when traveling:
Protect Your Instrument During Transport
- Use a hard case or a well-padded case to protect your instrument during transport.
- Make sure the case is strong enough to protect your instrument from impacts and falls.
- If you’re traveling by air, make sure your instrument fits in the overhead compartment or under the seat in front of you.
- If you’re traveling by car, make sure your instrument is securely fastened in the back seat or trunk.
Clean Your Instrument Before and After Travel
- Use a soft, dry cloth to wipe down your instrument before and after travel.
- Remove any dust or dirt that may have accumulated during travel.
- Check for any scratches or damage that may have occurred during travel.
Humidify Your Instrument During Air Travel
- Use a humidifier to keep your instrument’s wood moisturized during air travel.
- Avoid exposing your instrument to extreme temperature and humidity changes.
- If your instrument has a wooden finish, make sure it’s not exposed to direct sunlight or heat sources.
Keep Your Instrument in Its Case as Much as Possible
- Keep your instrument in its case as much as possible to avoid dust and dirt buildup.
- If you need to play your instrument in a public place, use a cloth or a screen to cover the keyboard or strings to prevent dust and dirt from accumulating.
By following these tips, you can ensure that your instrument stays clean and in good condition even when you’re on the go.
Keeping Your Instrument in Top Condition
Maintaining a clean instrument is essential for ensuring a healthy and long-lasting musical experience. To keep your instrument in top condition, it is important to follow a regular maintenance routine. This routine should include regular cleaning and upkeep of your instrument, as well as routine checks for any damage or wear and tear.
One of the most important aspects of keeping your instrument in top condition is to clean it regularly. This can help to prevent the buildup of dirt and debris, which can damage the instrument over time. Depending on the type of instrument you have, there are different methods for cleaning it. For example, stringed instruments like violins and guitars should be cleaned with a soft, dry cloth, while woodwind instruments like clarinets and saxophones should be cleaned with a specialized cleaning kit.
Another important aspect of keeping your instrument in top condition is to check it regularly for any damage or wear and tear. This can help to prevent any small issues from becoming bigger problems down the road. For example, if you notice that the keys on your piano are sticking, it may be a sign that the instrument needs to be tuned or serviced. Similarly, if you notice any cracks or damage to your instrument, it is important to have it repaired as soon as possible to prevent further damage.
Overall, keeping your instrument in top condition is essential for ensuring a healthy and long-lasting musical experience. By following a regular maintenance routine that includes regular cleaning and checks for damage or wear and tear, you can help to ensure that your instrument will continue to provide you with many years of musical enjoyment.
FAQs
1. Why is it important to clean my instrument?
Cleaning your instrument is crucial for maintaining its overall health and longevity. Dirt, dust, and other debris can accumulate on the instrument’s surface and inside its components, leading to damage and malfunction. This can affect the sound quality, and in severe cases, it can cause irreparable damage to the instrument. Additionally, regular cleaning helps to prevent the buildup of bacteria and other microorganisms, which can cause allergic reactions or respiratory problems for musicians.
2. What are the benefits of cleaning my instrument regularly?
Regular cleaning helps to keep your instrument in good condition, ensuring that it functions properly and produces the best possible sound quality. It also helps to prevent damage caused by dust, dirt, and other debris, which can accumulate over time and cause harm to the instrument’s components. By cleaning your instrument regularly, you can also help to prevent the buildup of bacteria and other microorganisms, which can cause health problems for musicians.
3. What are the best methods for cleaning my instrument?
The best method for cleaning your instrument will depend on the type of instrument you have and the specific cleaning needs it has. Some instruments may require a gentle cleaning with a soft cloth and mild soap, while others may need a more thorough cleaning with specialized cleaning products. It’s important to consult your instrument’s manual or manufacturer’s instructions for specific cleaning recommendations. Additionally, you should avoid using harsh chemicals or abrasive materials, as these can damage the instrument’s surface and components.
4. How often should I clean my instrument?
The frequency of cleaning will depend on the type of instrument you have and how often you use it. As a general rule, it’s recommended to clean your instrument at least once a week, or more frequently if it’s used heavily or in dusty or humid environments. If you’re unsure about how often to clean your instrument, it’s best to consult your instrument’s manual or manufacturer’s instructions for specific recommendations.
5. Can I clean my instrument with household cleaning products?
It’s generally not recommended to use household cleaning products to clean your instrument, as these can be harmful to the instrument’s surface and components. Instead, it’s best to use specialized cleaning products specifically designed for musical instruments. These products are gentle and effective at removing dirt, dust, and other debris without damaging the instrument’s surface or components. Additionally, it’s important to avoid using alcohol-based cleaning products, as these can damage the instrument’s finish and other delicate components.
6. Can I clean my instrument with water?
Yes, water can be used to clean some types of musical instruments, but it’s important to use it carefully and sparingly. Avoid using soap or other cleaning products when cleaning your instrument with water, as these can damage the instrument’s surface and components. Instead, use a soft cloth and gently wipe down the instrument’s surface with a small amount of water. Be sure to dry the instrument thoroughly with a soft cloth to prevent damage from moisture.
7. What should I do if I’m having trouble cleaning my instrument?
If you’re having trouble cleaning your instrument, it’s best to consult your instrument’s manual or manufacturer’s instructions for specific cleaning recommendations. Additionally, you can seek the advice of a professional musician or a music instrument repair technician. They can provide you with guidance on the best methods and products to use for cleaning your instrument, as well as help you to troubleshoot any issues you may be experiencing.